Description
DAkkS (17025) calibration of a standard thermometer (WGa ≥ 1,11807 or WHg ≤ 0,844235) at the temperature fixed points (freezing points, melting points & triple points) of the ITS-90.
Achievable DAkkS (17025) measurement uncertainties including ITS-90 deviation function (k=2):
| Temperature fixed points | in °C | Measurement uncertainties |
| Argon triple point | -189,3442 °C | 5 mK |
| Mercury triple point | -38,8344 °C | 3,5 mK |
| Water triple point | 0,01 °C | 2,5 mK |
| Gallium melting point | 29,7646 °C | 2,5 mK |
| Indium freezing point | 156,5985 °C | 5,5 mK |
| Tin freezing point | 231,928 °C | 3,0 mK |
| Zinc freezing point | 419,527 °C | 3,0 mK |
| Aluminium freezing point | 660,323 °C | 5,0 mK |
| Silver freezing point | 961,78 °C | 10 mK |
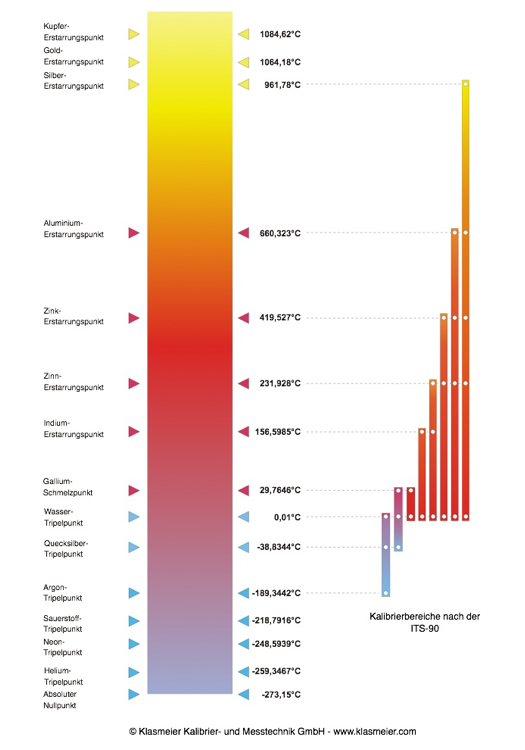
The temperature fixed points are selected according to the temperature ranges of the ITS-90. You can see the temperature ranges of the ITS-90 here:

Before calibration, the standard thermometer is annealed. Hydrostatic pressure effects that occur in the temperature fixed point cells are corrected. The self-heating of the standard thermometer is investigated before the start of calibration and taken into account when calculating the calibration results. The resistance and W values of the standard thermometer are given as calibration results, and two characteristic curves (coefficients) are calculated according to the ITS-90 (with measuring current 0mA and 1mA, unless otherwise specified).
Calibration in the range argon (-189 °C) to the water triple point (0.01 °C) additionally includes the specification of a measurement uncertainty for extrapolation according to EURAMET TG 01:2017 (to the nitrogen boiling point ,~196 °C) with a measurement uncertainty of 7 mK (k=2).
The minimum immersion depth of the standard thermometer is at -189 °C: 400 mm, in the range -38 °C to 660 °C: 300 mm and at 962 °C: 450 mm. The maximum outer diameter is 8 mm.
Calibration time approx. 5-7 working days or by arrangement.

Including Klasmeier Cloud:
Our digital archive for your calibration documents
From now on you will find a QR code on all devices calibrated by Klasmeier,
with which you can quickly and easily access our digital archive in order to view your
calibration results.


